multiai
A Python library for text-based AI interactions with multi-provider support
[ English 日本語 ]
multiai
multiai is a Python library and command-line tool designed to interact with text-based generative AI models from OpenAI, Anthropic, Google, Perplexity, Mistral, DeepSeek and xAI. This manual will guide you through the installation, configuration, and usage of multiai.
Table of Contents
- Supported AI Providers and Models
- Key Features
- Getting Started
- Advanced Usage
- Text-to-Speech Extension
- Using
multiaias a Python Library
Supported AI Providers and Models
multiai allows you to interact with AI models from the following providers:
| AI Provider | Web Service | Models Available |
|---|---|---|
| OpenAI | ChatGPT | GPT Models |
| Anthropic | Claude | Claude Models |
| Gemini | Gemini Models | |
| Perplexity | Perplexity | Perplexity Models |
| Mistral | Mistral | Mistral Models |
| DeepSeek | DeepSeek | DeepSeek Models |
| xAI | xAI | xAI Models |
| Local LLM | Ollama | Ollama Models |
- DeepSeek and Local LLM require version 1.1.0 or higher. xAI requires version 1.2.0 or higher. File attachment feature requires version 1.4.0 or higher. See release for details.
Key Features
- Interactive Chat: Communicate with AI directly from your terminal.
- Multi-Line Input: Supports multi-line prompts for complex queries.
- Pager for Long Responses: View lengthy responses conveniently using a pager.
- Continuation Handling: Automatically handle and request continuations if responses are cut off.
- Automatic Chat Logging: Automatically save your chat history for future reference.
- File Attachments (added in 1.4.0): Attach files as additional context.
Getting Started
Installation
To install multiai, use the following command:
pip install multiai
Setting Up Your Environment
Before using multiai, configure your API key(s) for your chosen AI provider(s) as descibed in API Key Management.
Basic Usage
Once your API key is set up, you can start interacting with the AI:
-
To send a simple query:
ai hiYou should see a response like:
gpt-4o-mini> Hello! How can I assist you today? -
For an interactive session, enter interactive mode:
aiIn this mode, you can continue the conversation:
user> hi
gpt-4o-mini>
Hello! How can I assist you today?
user> how are you
gpt-4o-mini>
I'm just a program, so I don't have feelings, but I'm here and ready to help you! How about you? How are you doing?
user>
Interactive Mode Details
In interactive mode, you can input multi-line text and control when the input is finished using the blank_lines parameter in the [command] section of the settings file. Here’s how it works:
- Single-Line Input: By default, input is finished when you press Enter after a line.
- Multi-Line Input: If you set
blank_lines = 1, input will finish only after a blank line (i.e., pressing Enter twice). This is particularly useful when you want to copy and paste text with multiple lines. If your input includes blank lines, increase theblank_linesparameter accordingly.
Interactive mode can be exited by:
- Input
q,x,quitorexit. - Sending EOF with
Ctrl-D. - Sending a KeyboardInterrupt with
Ctrl-C.
Configuration
Settings File
multiai reads its settings from a configuration file, which can be located in the following order of precedence:
- System Default: system default settings
- User-Level:
~/.multiai - Project-Level:
./.multiai
Settings from the latter files overwrite those from the former.
Here’s an example of a configuration file:
[system]

[model]
ai_provider = openai
openai = gpt-5.2
anthropic = claude-sonnet-4-5
google = gemini-2.5-flash
perplexity = sonar
mistral = mistral-large-latest
deepseek = deepseek-chat
xai = grok-4-latest
local = gpt-oss:20b

[default]
temperature = 0.7
max_requests = 5

[command]
blank_lines = 0
always_copy = no
always_log = no
log_file = chat-ai-DATE.md

[prompt]
color = blue
english = If the following sentence is English, revise the text to improve its readability and clarity in English. If not, translate into English. No need to explain. Just output the result English text.
url = Summarize following text very briefly.

[api_key]
openai = (Your OpenAI API key)
anthropic = (Your Claude API key)
google = (Your Gemini API key)
perplexity = (Your Perplexity API key)
mistral = (Your Mistral API key)
deepseek = (Your DeepSeek API key)
xai = (Your xAI API key)
Selecting Models and Providers
The default AI provider is specified in the [model] section of the settings file. However, you can override this via command-line options:
-ofor OpenAI-afor Anthropic-gfor Google-pfor Perplexity-ifor Mistral-dfor DeepSeek-xfor xAI-lfor local LLM
You can also specify the model using the -m option. For example, to use the gpt-4o model from OpenAI:
ai -om gpt-4o
When multiple AI provider options are given, for example:
ai -oa
you can communicate with multiple models simultaneously. Default model for each provider is used.
API Key Management
API keys can be stored as environment variables:
OPENAI_API_KEYfor OpenAIANTHROPIC_API_KEYfor AnthropicGOOGLE_API_KEYfor GooglePERPLEXITY_API_KEYfor PerplexityMISTRAL_API_KEYfor MistralDEEPSEEK_API_KEYfor DeepSeekXAI_API_KEYfor xAI
If environment variables are not set, multiai will look for keys in the [api_key] section of your settings file.
Using a Local LLM
To use a local LLM, follow these steps:
- Install Ollama.
- Start Ollama by running
ollama servein your terminal. - Pull a model to use, for example:
ollama pull llama3.3. - Start a mltiai session by running
ai -lm llama3.3.
Advanced Usage
Model Parameters
Parameters such as temperature and max_tokens can be configured in the settings file or via command-line options:
- Use the
-toption to set thetemperature. max_tokensparameter can be omitted.
If the response is incomplete, multiai will request additional information until the specified number of requests, max_requests, is reached.
Input Options
-
-eOption: Adds a pre-prompt to correct or translate English text. This pre-prompt is defined in theenglishparameter in the[prompt]section of the settings file.Example:
ai -e This are a test -f FILE [FILE ...]Option (added in 1.4.0): Attach one or more files as additional context. Supported with special handling: txt, md, pdf, docx, html/htm, csv. Unknown extensions are accepted if the content is valid UTF-8 text (no NUL bytes); otherwise the file is rejected as unsupported.--attach-limit N(added in 1.4.0): Per-attachment character limit. If an attachment exceeds this limit, it is auto-summarized and a message is shown indicating the overage.- If no prompt is provided (e.g.,
ai -f notes.md), attachments are applied to the first turn only; thenmultiaienters interactive mode for subsequent turns. - Example:
ai "Summarize these materials" -f a.pdf b.docx --attach-limit 50000
ai -f notes.md
-
-u URLOption: Automatically retrieves and converts the content of a given URL to text. If the URL ends in.pdf, the content of the PDF file is also converted to text. The program will summarize the text based on a pre-prompt and then allow for further interactive queries about the content. If you want the program to summarize in your native language, rewrite the pre-prompt defined in theurlparameter in the settings file in your language.Example:
ai -u https://en.wikipedia.org/wiki/Artificial_intelligence
Note:
- In 1.4.0, the old
-f/--factualoption was removed. If you need a factuality-focused pre-prompt, include it manually in your prompt text or your settings.
Output Options
- Paging Long Responses: If a response exceeds one page in your terminal,
multiaiuses pypager to display it. - Copy to Clipboard: Use the
-coption to copy the last response to the clipboard. Ifalways_copy = yesis set in the[command]section of the settings file, this option is always enabled. - Logging Chats: Use the
-soption to log the chat to a file namedchat-ai-DATE.mdin the current directory, whereDATEis replaced by today’s date. The file name can be changed with thelog_filekey in the[command]section. Ifalways_log = yesis set in the[command]section, this option is always enabled.
Command-Line Options
To see a list of all command-line options, use:
ai -h
Text-to-Speech Extension
You can extend multiai with Text-to-Speech capabilities with OpenAI, Google GenAI, and Azure Speech, by installing multiai-tts.
Installation
pip install multiai-tts
Note: ffmpeg is required if you want to save audio in formats other than WAV (e.g., MP3).
API Key Configuration
The extension uses the same API key configuration mechanism as multiai. For OpenAI and Google, API keys are already explained in the main configuration section. For Azure TTS, a separate Speech-specific API key is required, which is different from the Azure OpenAI API key and is used only for Text-to-Speech. This key is obtained by creating an Azure Speech resource in the Azure portal. After the resource is deployed, the key and endpoint can be found in the resource’s “Keys and Endpoint” section, and must be configured in multiai for TTS to function.
You can configure Azure TTS in your multiai settings file:
[api_key]
azure_tts = (Your Azure Speech API key)

[azure_tts]
region = japaneast
Alternatively, you can set the values via environment variables:
AZURE_TTS_API_KEY→ Your Azure Speech API keyAZURE_TTS_REGION→ The Azure region of your Speech resource (e.g.,japaneast)
Usage Example
import multiai_tts

client = multiai_tts.Prompt()

# Azure TTS
client.set_tts_provider('azure')
client.tts_voice_azure = 'en-US-JennyNeural'

# Speak directly
client.speak("Hello, this is a test from Azure TTS.")
if client.error:
    print(client.error_message)

# Save to file
client.save_tts("Saving this audio to mp3.", "output_azure.mp3")
if client.error:
    print(client.error_message)
For more details, see the multiai-tts PyPI page.
Using multiai as a Python Library
multiai can also be used as a Python library. Here’s a simple example:
import multiai

# Initialize the client
client = multiai.Prompt()
# Set model and temperature.
# If not written, default setting is used.
client.set_model('openai', 'gpt-4o')
client.temperature = 0.5

# Send a prompt and get a response
answer = client.ask('hi')
print(answer)

# Continue the conversation with context
answer = client.ask('how are you')
print(answer)

# Clear the conversation context
client.clear()
If an error occurs during client.ask, the error message will be returned, and client.error will be set to True.
Sample script to translate a text file
Here is an example of a Python script using the multiai library to translate a text file. Save the following code as english.py.
import multiai
import sys
pre_prompt = "Translate the following text into English. Just answer the translated text and nothing else."
file = sys.argv[1]
with open(file) as f:
    prompt = f.read()
client = multiai.Prompt()
client.set_model('openai', 'gpt-4o')
answer = client.ask(pre_prompt + '\n\n' + prompt)
print(answer)
Then if you have a markdown file of text.md in Japanese, for example, run
python english.py text.md
Then the translated English is shown. If you want to save it to output.md, just redirect the result by
python english.py text.md > output.md
If you change pre_prompt parameter, you can make various kinds of script.
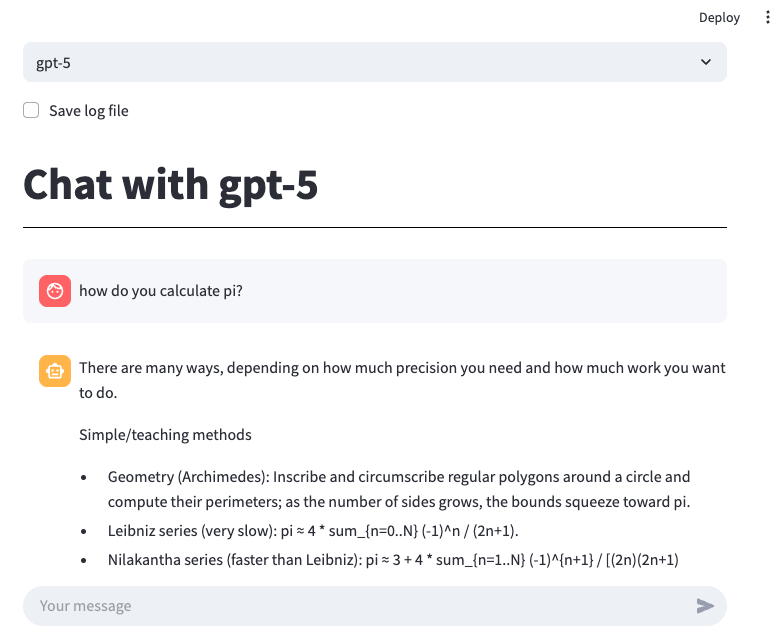
Running your local chat app
You can run your local chat app using streamlit.
Install streamlit by running the following command:
pip install streamlit
Download app.py and run your local server with the following command:
streamlit run app.py
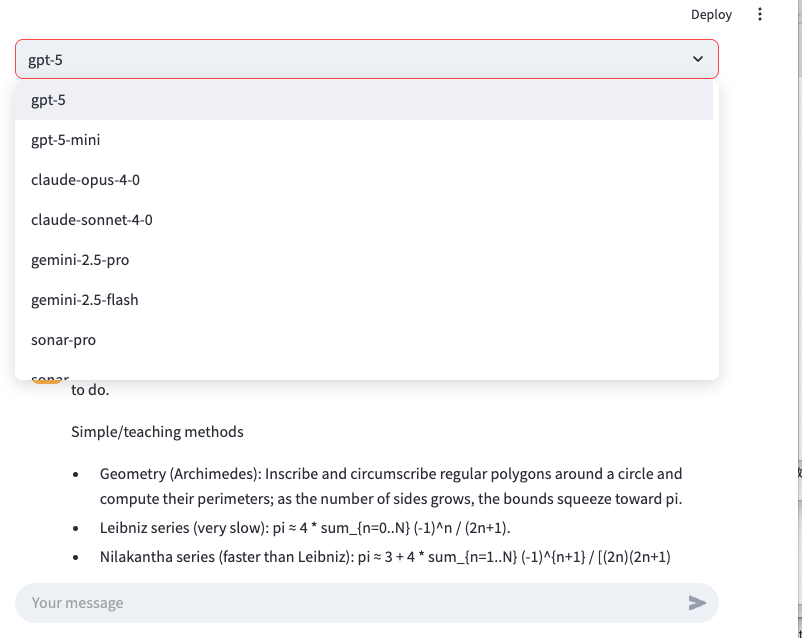
Once the server is running, your default web browser will open and display the chat application, Chotto GPT. This app allows you to easily select from a variety of AI models from different providers and engage in conversations with them. It also supports uploading files (any extension). Uploaded files are processed in memory and included as context in the next message if you enable it. You can customize the list of available models and the log file location by directly editing the source code.
Running on Google Colab
To run on Google Colab, use this notebook. You will need to set API keys in your Colab Secrets.