 slidemovie
GUI Guide
GUI Guide
The Tkinter GUI provides the same build workflow as the command line without requiring every option to be typed. Its appearance uses Forest ttk theme (MIT License).
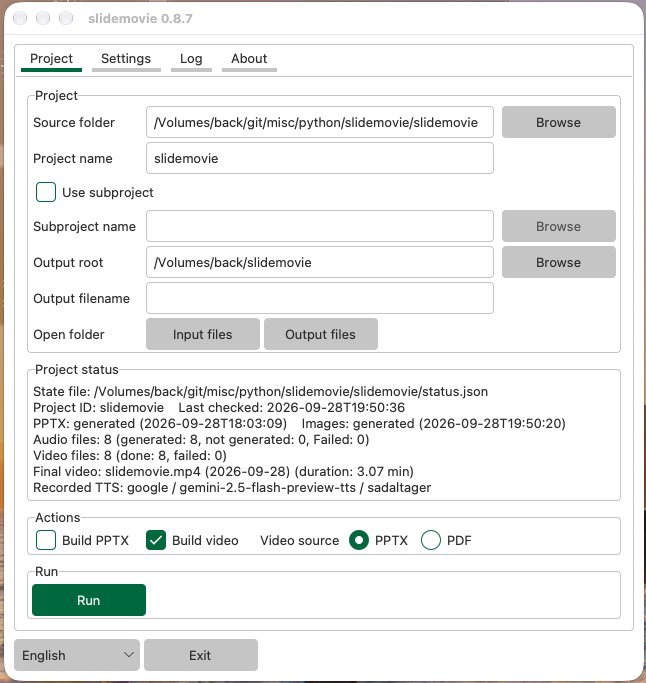
Start the GUI
Run the following after installing slidemovie:
slidemovie -g
Command-line values can prefill the GUI. For example, slidemovie demo -g --video enters demo and selects video generation.
When you close the window, its width and height are saved to ~/.config/slidemovie/gui.json and restored on the next launch. Its screen position is not saved.
Build a project
- Set Source folder and Project name.
- Under Actions, select Build PPTX, Build video, or both.
- In Video source beside Build video, select PPTX normally, or PDF for a video made from a PDF.
- Click Run in the separate Run section.
While a build is running and after it completes, the area to the right of Run shows Running, Succeeded, Failed, or Cancelled. Changing the source folder, project name, or subproject name clears the result from the previous project.
While a build is running, a Cancel button is shown. After selecting it, the status changes to Cancelling…. The active TTS, conversion, or FFmpeg work unit is allowed to finish, then later work is skipped and the status becomes Cancelled. External programs are not forcibly terminated. Completed assets remain available for the next incremental build.
Use Input files and Output files under Open folder to open the actual project source and output directories in your file manager.
Output filename is the name of the generated video without its extension. If it is blank, the project ID is used. The CLI -f option can prefill and override this value.
Settings
The Settings tab initially shows the effective values from config.json.
- TTS settings include the provider, model, voice, prompt, prompt use, prompt separator, and narration splitting settings.
- Video format includes
screen_size,image_pad_color, andvideo_fps. - General includes
silence_sec.
For the prompt separator and split characters, line breaks are shown as \n in the fields and are converted to actual line breaks when the build runs. Restore settings returns the fields to the values loaded from configuration.
Save to local config saves the settings fields and output filename to config.json beside the input Markdown file and loads them the next time the GUI starts. Output root is not saved. For a subproject, this is source-folder/subproject/config.json; for a regular project, it is source-folder/config.json. Existing settings that the GUI does not edit are preserved.
Project status and recorded settings
The Project status panel summarizes status.json: the PPTX and image tasks, slide counts, audio-file generation counts, and recorded TTS provider/model/voice. It does not display narration text, prompts, hashes, or credentials.
When the current TTS settings differ from status.json, choose one of the following:
- Use status.json settings: uses the recorded settings and copies every recorded TTS and build setting into the Settings tab.
- Overwrite with current settings: continues with the current GUI settings and updates the recorded TTS settings.
- Cancel: stops before building.
The interface is available in English and Japanese.
About
The About tab shows the icon, the version of slidemovie currently running, a Website button for the selected language, and a Feedback button that opens GitHub Issues. It also reports the OS, Python, Tk, locale, working directory, user configuration location, related Python packages, and the detected paths and versions of FFmpeg, Pandoc, LibreOffice, Poppler, and ImageMagick.
Click Copy information to copy these troubleshooting details as one report. It does not include API keys, prompts, status.json contents, or PATH.
Create a GUI shortcut
If you use the GUI regularly, you can create a shortcut to open it from the desktop or Applications folder. Download the script and icon for your operating system below.
Download the script and its matching icon into the same folder:
- Windows: shortcut script and icon (
.ico) - macOS: app-creation script and icon (
.icns)
Windows
Open PowerShell in the downloaded folder and run:
Set-ExecutionPolicy -Scope Process Bypass
.\create-slidemovie-shortcut.ps1
The script creates SlideMovie.lnk on the desktop. It automatically finds pythonw.exe and opens the GUI without showing a console window. It also records the creation-time PATH in a small launcher, so external tools such as FFmpeg remain available when you start the shortcut from Explorer. In the usual case, the command above is all you need; do not edit the script.
You do not need to recreate the shortcut after upgrading slidemovie in the same Python environment: it starts the upgraded package through the same pythonw.exe. Recreate it only if you install slidemovie into a different Python environment.
If the first attempt reports that Python cannot be found, paste and run these two lines together in PowerShell. The first line uses the Python Launcher to find pythonw.exe; the second passes that location to the shortcut-creation script. You do not need to edit either the shortcut or the script.
$pythonw = & py -3 -c "import sys; print(sys.executable.replace('python.exe', 'pythonw.exe'))"
.\create-slidemovie-shortcut.ps1 -PythonPath $pythonw
The discovered pythonw.exe path becomes the launch target of the created SlideMovie.lnk.
macOS
Open Terminal in the downloaded folder and run:
chmod +x create-slidemovie-app.command
./create-slidemovie-app.command
The script creates and opens ~/Applications/SlideMovie.app. It explicitly passes the folder where you ran the creation script as --source-dir, so that folder becomes the initial source folder. Run the script from the folder you want to use. It also records the creation-time PATH so that external tools installed through Homebrew remain available when you open the app directly from Finder. Move the app to /Applications if you want it available to every user on the Mac. If startup fails, check ~/Library/Logs/SlideMovie.log. The script records the current slidemovie command path; run which slidemovie first if you need to check which Python environment will be used.
You do not need to recreate the app after upgrading slidemovie in the same Python environment: the recorded command starts the upgraded package at the same location. Re-run the creation script only if you install slidemovie into a different Python environment.